Creating and handling themes is very easy with Jetpack Compose. In this blog, we’ll see “easy” and “hard” way to implement it.
The easy way is to let the system decide our theme, which means if users set the “Dark Mode” or “Dark Theme” in their phone, our application will also be in Dark Mode.
The hard way, on the other hand, like the name suggests, requires more work but is not really hard. We’ll have to manually check what the user wants and set the theme according to that.
Before we start, I’ll be using this website to build my theme. It’s very useful and easy to use.
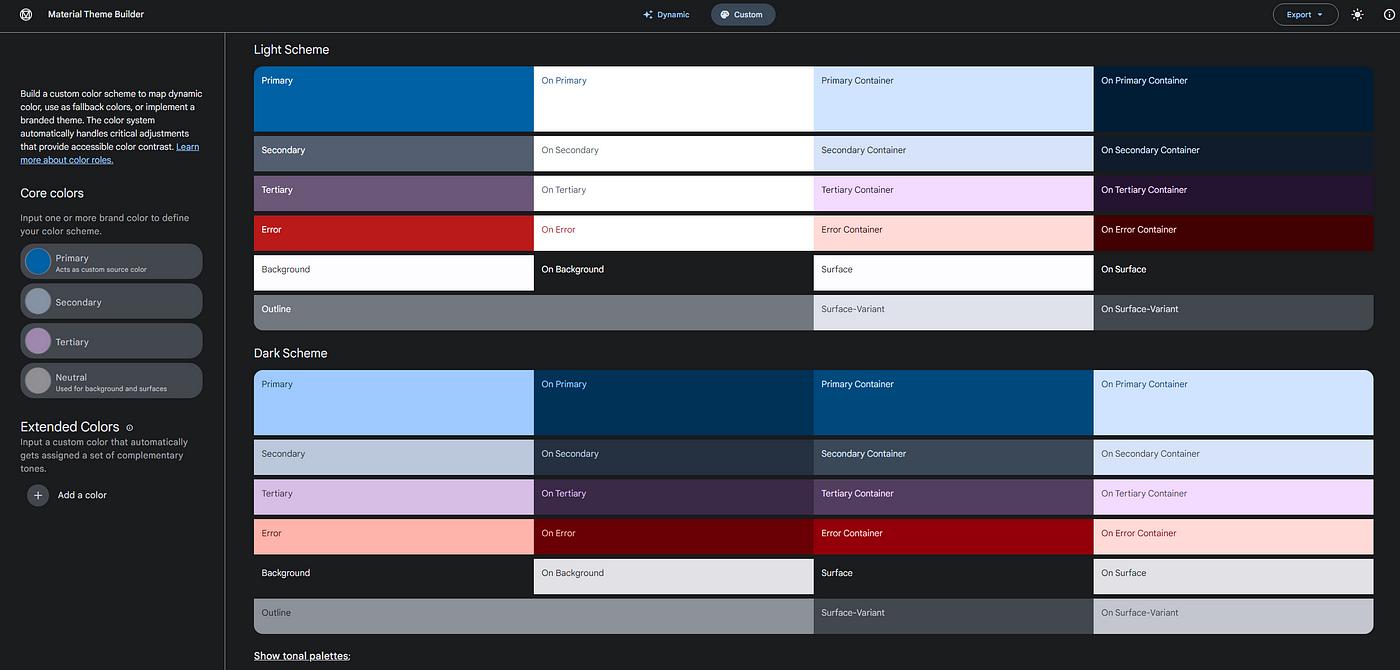
Table of Contents
Getting Started
First, let's add Material 3 dependency. You can see the latest M3 versions on the Compose Material 3 releases page.
def material3_version = "1.0.1"
implementation "androidx.compose.material3:material3:$material3_version"
Optionally, if you are already using Material 2, you can follow this blog and migrate to Material 3.
Setting the Colors
I’ve copied color codes from the Material 3 theme builder website to ui.theme/Color.kt.
Now we are ready to go. Let’s see the easy and hard ways.
Easy Way
After adding colors, let’s head to ui.theme/Theme.kt and set our colors.
That’s it! It’s that easy. You can access to theme colors anywhere in the project with MaterialTheme.colorScheme.<Color> e.g. MaterialTheme.colorScheme.onPrimaryContainer
Now let’s test it.

Hard Way
Since we already have our colors and theme, we can skip that part.
Let’s add DataStore dependency.
implementation "androidx.datastore:datastore-preferences:1.0.0"Now, we are ready to create our DataStore util class.
After this, we’ll create our ViewModel to handle state. This ViewModel is very simple, we’ll just keep isDarkThemeEnabled state variable and listen changes.
Finally, we’ll implement our logic into our UI. This class will be little bit longer, so let’s explain part by part.
First, we create our themeViewModel and dataStoreUtil objects.
Next, we get systemTheme which simply checks if system theme is Dark Theme or not. This is necessary because when user opens the app, our DataStore is empty, we don’t have any data yet, so we get user’s system theme. We can skip this part and simply set false instead of systemTheme it’s up to you.
After that, we create theme variable which returns saved value from DataStore.
Finally, we set the darkTheme value of our theme to theme variable in order to apply correct theme colors.
Now let’s see our UI part.
Again, we first create our variables. We set the switchState variable to themeViewModel.isDarkThemeEnable so whenever we toggle the switch our UI will be recomposed. coroutineScope is for saving the theme preference to DataStore since saveTheme function is a suspended function.
Lastly, onCheckedChange is triggered whenever user toggles the switch. In onCheckedChange we change both switchState variable and save the theme preference to DataStore so whenever user restarts the application, we’ll be able to “remember” and set theme accordingly.
That’s it! Now let’s see the result.
The END, I hope it was useful. 👋👋